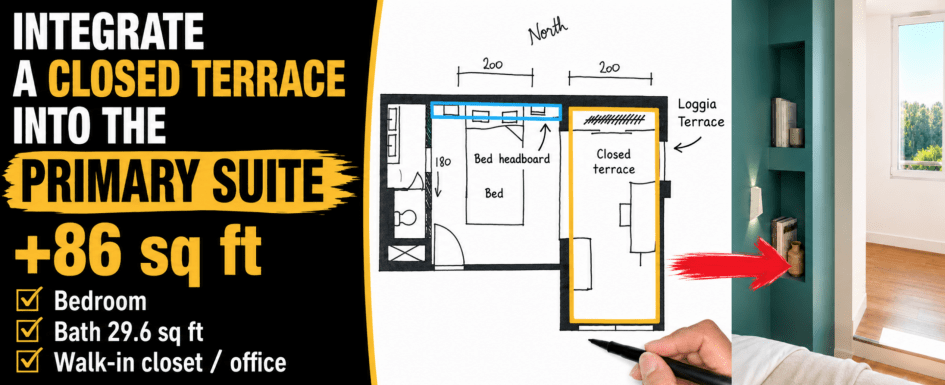
Closing an 86 sq ft loggia and integrating it into a 101 sq ft bedroom to create a 213 sq ft master suite in an apartment — this is the project we’ll walk through in full, from the first floor plan to the completed build. The operation requires no work on the load-bearing walls. It follows a rigorous architectural method, from reading the existing plan through to final finishes. For other examples of master suite conversions, see our detailed project of a primary suite design: layout ideas and expert architectural tips.
By Mathieu, Certified Interior Architect (updated June 2026)
Closing a loggia in an apartment: 86 sq ft reclaimed, a complete master suite delivered.
1. Pre-work assessment: 101 sq ft bedroom, 30 sq ft bathroom and 86 sq ft loggia to merge into one volume
2. Building the right brief: co-ownership approval, change of use and hybrid rental/personal use constraints
3. The suite floor plan: partitioning, pocket door and custom-built headboard by an interior architect
4. 30 sq ft bathroom: 31 x 31 in walk-in shower, 47 in double vanity and volume optimization
5. The closed loggia converted: 6 ft 7 in closet run, home office and new windows
6. From plan to build: demolition, loggia insulation, tiling and finishes
7. Frequently asked questions
Mathieu presents the complete floor plan, design decisions, and build of this master suite in this video.
Pre-work assessment: 101 sq ft bedroom, 30 sq ft bathroom and 86 sq ft loggia to merge into one volume
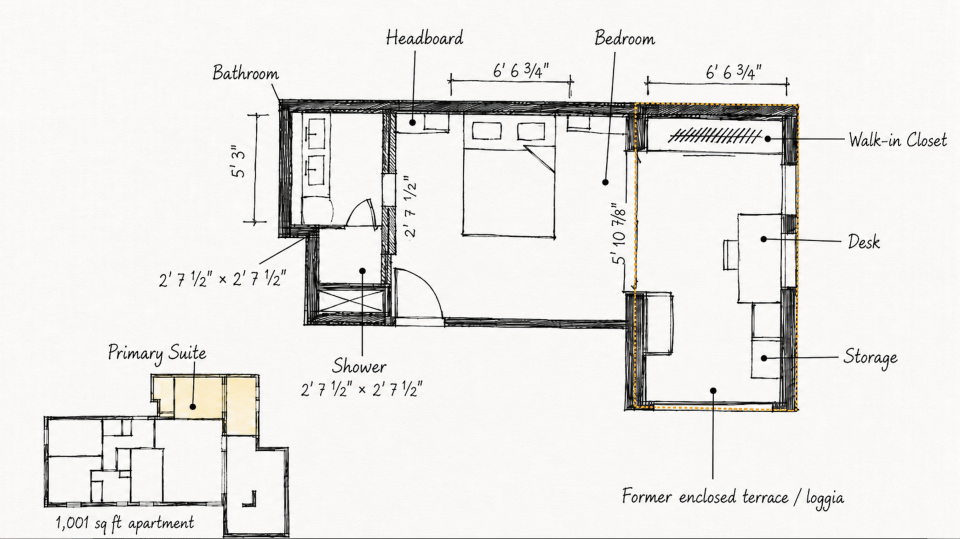
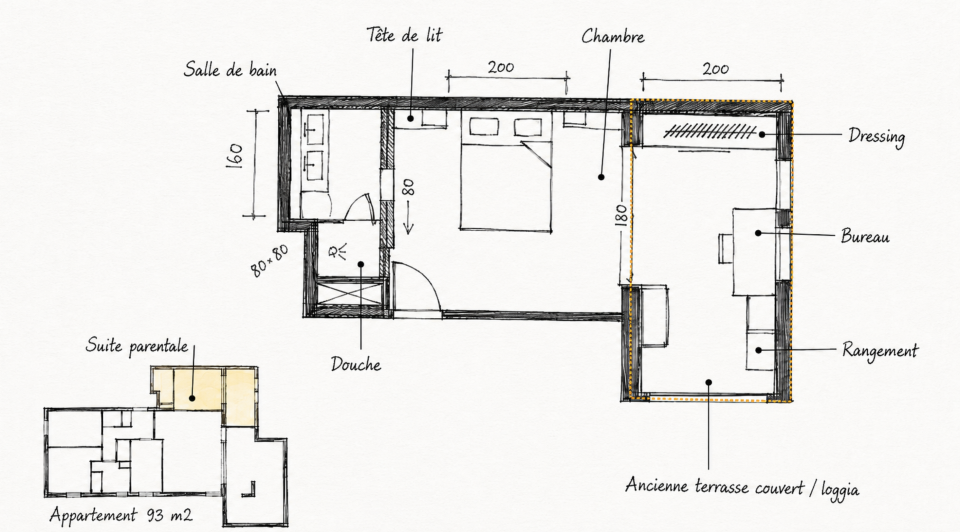
The starting point is a 1,001 sq ft apartment. The future master suite consists of two adjoining spaces accessed from a distribution hallway: a bedroom and a bathroom separated by a partition with door. The combined footprint is 101 sq ft. The 30 sq ft bathroom already has a usable drain stack and an existing shower with a technical half-wall. The existing vanity unit is oversized for the available volume.
On the loggia side, an 86 sq ft south-facing space is accessible from the bedroom through a 71 in wide sliding glass door. The existing floor sits on pedestals with a panel surface finish. Two windows and the sliding door are to be removed. The loggia represents an underused volume directly adjacent to the bedroom, ideally positioned to be integrated without touching any load-bearing wall.
Building the right brief: co-ownership approval, change of use and hybrid rental/personal use constraints
Integrating a loggia into the apartment constitutes a change of use from an outdoor space to an interior one. This operation requires a vote at the building owners’ general assembly and completion of the corresponding administrative procedures. On this project, all steps were handled upfront: the co-ownership granted approval, allowing the works to proceed without complications.
The second layer of constraints comes from the project brief. The property has a hybrid use: a rental investment for short and medium-term stays, plus a personal base for the owner. This dual use drives specific trade-offs that would not apply to a primary residence. Every technical decision and layout option was evaluated through that lens: functionality for rental guests, comfort for the owner, low-maintenance finishes throughout.
A hybrid rental/personal-use property requires priorities to be established at the design stage. Rental yield can push the brief in a different direction from what you would choose for a primary home. On this project, the decision not to include a toilet in the suite was deliberate: the drain stack would have permitted it, but the owner determined that the comfort gain did not justify reducing the bathroom footprint.
The suite floor plan: partitioning, pocket door and custom-built headboard by an interior architect
The new partitioning defines three distinct zones: the bathroom, the bedroom with headboard, and the converted loggia with walk-in closet and home office. The wall between the bathroom and the bedroom integrates a 31 in pocket door that slides entirely into the wall thickness, playing on depth variations to create a flush recess. This eliminates any swing clearance and keeps circulation smooth in a constrained volume. For a concrete example of how this suite program scales at a larger footprint, see our project of a 270 sq ft basement master suite with closet, bathroom, and home office.
The headboard is designed to work within the space constraints rather than against them. It incorporates open niches on both sides with concealed electrical outlets and switches. The internal width of the headboard unit is 6 ft 7 in, which accommodates a 63 x 79 in (queen) bed with workable clearance on both sides. A 71 in (king) option was studied but not retained. A single step at the bedroom-to-loggia threshold is kept to reflect the existing floor level change.
30 sq ft bathroom: 31 x 31 in walk-in shower, 47 in double vanity and volume optimization
In 30 sq ft, the program is demanding but achievable with the right trade-offs. The existing drain stack is kept and put to use. The shower is compact at 31 x 31 in, with a fixed panel and a hinged door to free up space on the vanity side. This was preferred over a larger curbless shower in order to preserve the floor area allocated to the vanity unit.
The vanity measures 47 in with a double-basin setup, meeting the comfort requirement for both rental and personal use. A back ledge integrates the drain connections. A technical half-wall completes the plumbing zone. Space remains for a full-height storage column. The heated towel rail is positioned taking the pocket door swing clearance into account.
A variant with a wall-hung toilet had been studied — the drain stack would have supported it. The owner did not retain it on rental yield grounds, choosing to keep the full bathroom footprint undivided. For more space optimization methods in this type of constrained wet room, see our project on converting a kitchen into a master suite with bathroom and walk-in closet.
The closed loggia converted: 6 ft 7 in closet run, home office and new windows
The 86 sq ft south-facing loggia becomes the highest-quality volume in the suite once integrated. The floor work is substantial: removal of the pedestal-and-panel system, substrate preparation, new screed with integrated slope toward a built-in drainage channel, then a waterproof membrane. The perimeter insulation is fully replaced. The result is a new floor slab — fully watertight — on which the laminate flooring can be laid in continuous run with the bedroom.
New operable windows are installed in the opening left by the 71 in sliding door. They bring natural daylight through to the bedroom while providing the thermal performance of a proper interior envelope. Along the wall, a sliding-door closet delivers a 6 ft 7 in run at shallow depth — sufficient for hanging garments and shelves. A desk is positioned facing the windows with mid-height storage to exploit the south light. Opposite, full-height or mid-height storage units complete the program.
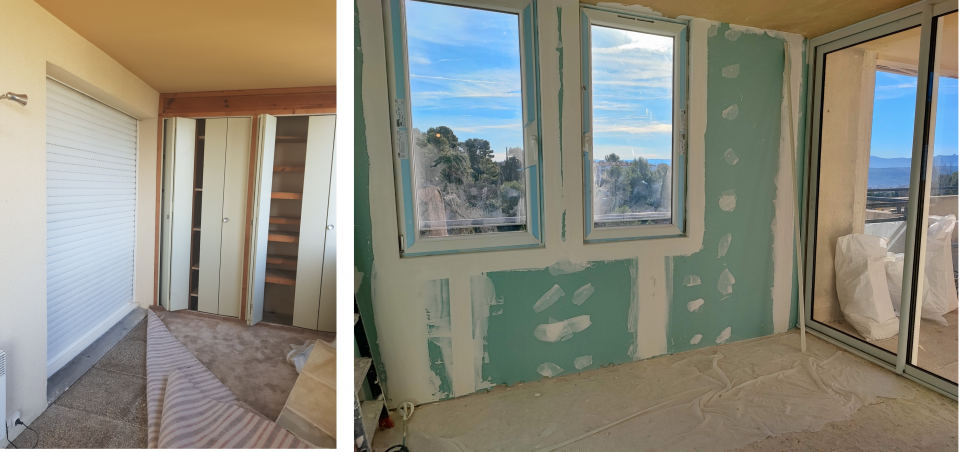
On loggia conversions, the most consistently underestimated item is floor waterproofing. A screed with a built-in slope and a proper drainage channel is not optional — it is what protects the new floor from water ingress over the long term. A loggia floor that was not properly waterproofed will show damage within two or three winters. Budget for it correctly from the start.
From plan to build: demolition, loggia insulation, tiling and finishes
Construction starts on the loggia side: full strip-out, floor treatment, waterproofing membrane, perimeter insulation, and new drylining. The insulation is installed before the walls are closed. In the bathroom, a complete strip-out preserves the existing rough plumbing to limit reconnection costs. Moisture-resistant drywall is installed on a clean substrate. The vanity back ledge and the technical half-wall are built. The pocket door is completed within its wall thickness.
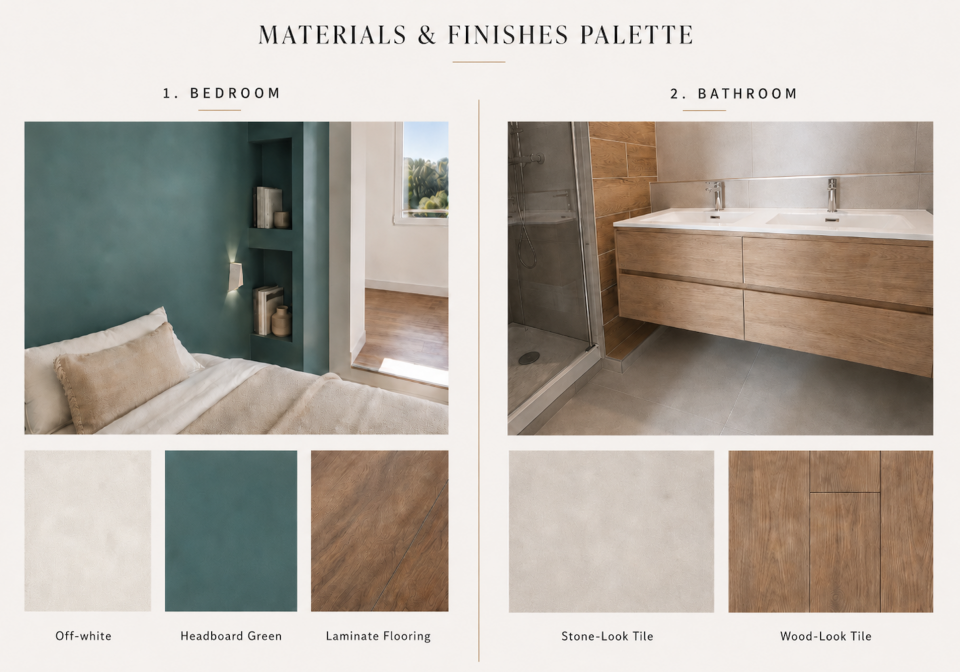
Stone-effect and wood-effect floor and wall tile are laid in continuous run across both volumes. The headboard is assembled with four electrified recessed niches. Laminate flooring is installed through the bedroom and the converted loggia. The double vanity is shifted toward the shower to improve circulation. The headboard is painted and the wall sconces are fitted. Lighting is layered throughout: recessed downlights in the bathroom, bedside sconces controlled from inside the headboard, central ceiling fitting, and double task lighting in the closet and home office zones.
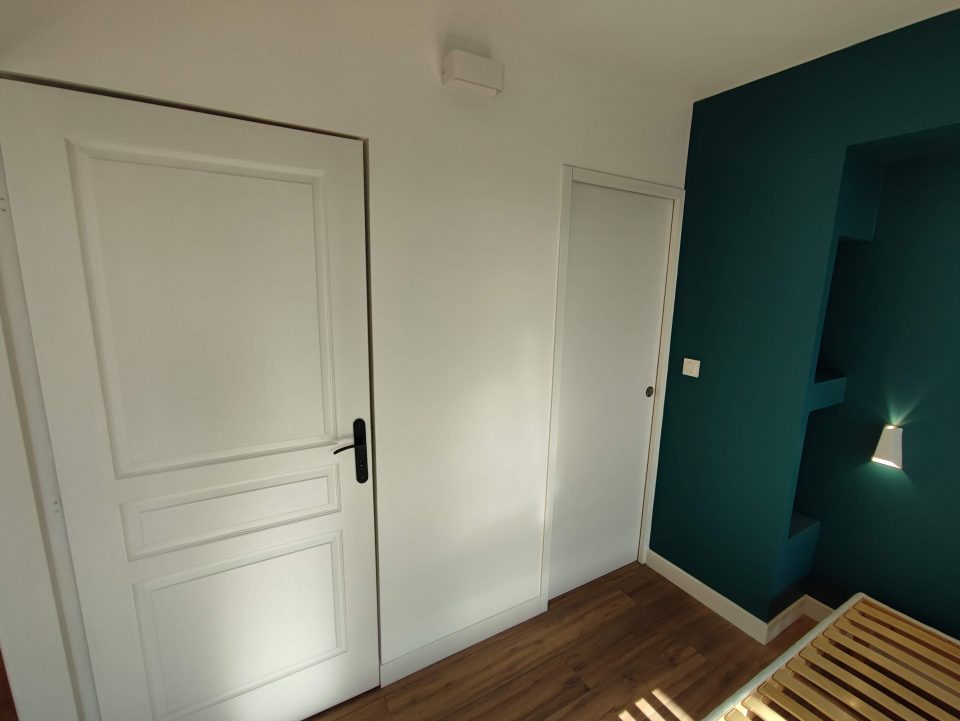
The result: 86 sq ft of closed loggia converted into a complete 213 sq ft master suite with bathroom, walk-in closet, home office, and a queen-size bedroom. A dense program, consistent with the hybrid use brief, designed around the real constraints of the existing building without touching any load-bearing structure. Find all our master suite and floor plan projects on the ArchiWorking YouTube channel.
Mathieu

Frequently Asked Questions About Closing a Loggia to Create a Master Suite
Do you need building permission to close a loggia and convert it into interior space?
In a co-ownership building, yes. A loggia typically forms part of the common areas held under private enjoyment. Converting it from outdoor to interior use requires a vote at the general assembly of owners and completion of the relevant administrative steps. These procedures must be completed before any work begins — they determine the feasibility of the entire project.
How do you waterproof a former loggia floor when converting it to interior use?
The existing surface — pedestals, panels, any existing screed — is fully stripped back. A new screed is poured with an integrated slope toward a built-in drainage channel or floor drain, then sealed with a waterproof membrane. This is what protects the finished floor from water ingress over time. A loggia floor that was not properly waterproofed will fail within a few winters.
What is the minimum bathroom size for a master suite conversion?
27 sq ft is the practical minimum. At 30 sq ft — as in this project — it is possible to install a 31 x 31 in walk-in shower, a 47 in double vanity, and a full-height storage column with workable circulation, provided the fixtures are positioned in relation to the existing drain stack.
Can an 86 sq ft converted loggia fit both a walk-in closet and a home office?
Yes, by stacking the functions efficiently. In this project, the 86 sq ft loggia accommodates a 6 ft 7 in sliding-door closet along one wall, a desk facing the windows with mid-height storage, and additional shelving opposite. The south-facing exposure and natural daylight make it the best-quality volume in the suite.
How do you design a custom headboard with built-in storage in a master suite?
The headboard is framed in drywall with open niches on both sides, wired with concealed switches on the inner face. The internal width is set to match the bed size — queen or king — with adequate clearance on both sides. This approach delivers a custom-built finish at standard drylining cost, without the price of traditional joinery.