How do you transform the upper floor of a 145 m² house to create 4 bedrooms, including 2 master suites, 3 bathrooms with WC and a coherent living area? That is the challenge of this project: completely redesigning the layout of an existing first floor so that three parameters that cannot be negotiated separately all work together – the volumes, the wet rooms and the technical networks. In this type of project, technical constraints directly shape architectural decisions. You do not draw the partition walls first and look for the pipework afterwards. The same principles that guide the design of a family bathroom apply here at the scale of an entire floor.
By Mathieu, qualified interior architect – April 2026
Redesigning a floor means making the volumes, the bathrooms and the networks work as one.
1. Existing floor plan analysis: circulation, access and volumes
2. Full demolition: removing partition walls to redistribute
3. Master suite 1: bedroom, shower room, WC and walk-in wardrobe
4. Networks without a stack pipe: using the staircase gradient
5. Master suite 2 and bedrooms 3 and 4
6. Shared bathroom: bathtub, shower, WC and vanity unit
7. Glass partition, living area and overall technical logic
Clara and Mathieu walk through the complete redesign of this floor in detail in this video.
Watch this video directly on YouTube
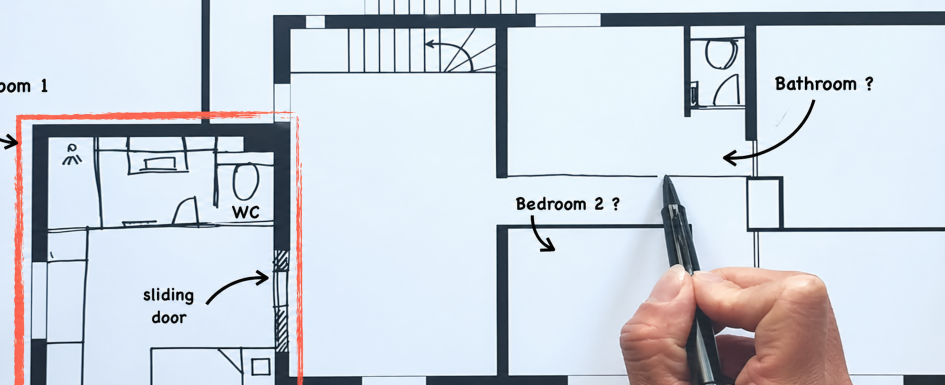
Existing floor plan analysis: circulation, access and volumes
The starting point: a floor with interior circulation via a staircase and an exterior access from a terrace with a return staircase. The central hallway leads to a large living area with a full kitchen and utility room, an existing bathroom with a washbasin, corner bathtub and shower on a raised tray, two small wardrobes accessible from the hallway and the bathroom, an independent WC and three bedrooms with storage. The existing glazed veranda is underused. The goal: transform this layout into two master suites, two independent bedrooms, three bathrooms with WC and a functional shared living area.
Before drawing anything, the constraints are mapped out: where the existing networks are located, the position of the technical stack pipes, where the grey water drainage runs and what the ceiling height is in each zone. This preliminary work conditions everything that follows. Moving a drainage outlet is expensive. Creating a wet room without a nearby technical stack requires a specific diversion solution. These constraints are not obstacles – they are design parameters to be integrated from the very first sketches.
On a complete floor redistribution project, always start with a precise survey of the existing networks before drawing the new plan. The position of the drainage stacks, water supply inlets and technical conduits determines which bathroom configurations are actually feasible and which will generate significant additional costs. A plan drawn without this preliminary survey almost always produces expensive surprises during construction.
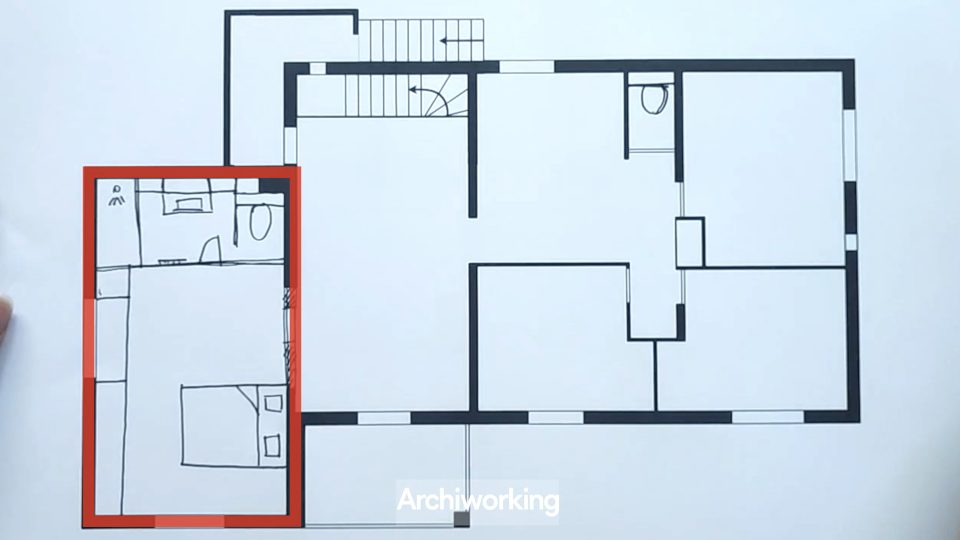
Full demolition: removing partition walls to redistribute
The decision to start from scratch on this floor comes from a simple observation: the existing volumes do not match the desired uses. The living area with kitchen, the scattered small wardrobes and the existing bathroom occupy space inefficiently. By removing all the perimeter partition walls, all the dry lining on the staircase side and the entire kitchen, large volumes are recovered that can be redistributed coherently.
Demolishing the existing shower tray is also necessary: it conditions the geometry of the new bathroom and the routing of the networks. A large volume on the glazed veranda side is intentionally preserved for the shared living area. This decision is an architectural choice, not an oversight: the veranda provides natural light and usable ceiling height that enriches the shared living space once repurposed.
Master suite 1: bedroom, shower room, WC and walk-in wardrobe
The first master suite occupies the main volume on the staircase side. It is organised around a pocket sliding door that allows the full volume to remain open during the day while separating the bedroom from the shower room at night. Choosing a pocket door over a hinged door is as much a technical decision as an aesthetic one: it avoids losing the door swing in a constrained space and maintains the visual flow of the room.
The shower room of this suite integrates a WC in a boxing, a shower with a 180 x 80 cm tray and a 1.20 m vanity unit with a U-shaped worktop. These dimensions are not chosen at random: a 180 x 80 tray allows a genuine walk-in shower with comfortable clearance. A 1.20 m vanity unit accommodates two people simultaneously. The walk-in wardrobe is integrated with a lower recessed section compensating for the presence of a window, and a 2 m x 2 m volume that provides genuine storage capacity for two people.
Networks without a stack pipe: using the staircase gradient
This is the most technically interesting point of the project. The first master suite has no networks or technical stack pipes in its immediate vicinity. The solution: use the descent of the staircase shaft to route the networks towards the technical zone of the house on the ground floor. The natural gradient of the staircase allows the necessary drainage falls to be achieved without resorting to an electric pumping system. It is an elegant solution that takes advantage of an existing structural constraint rather than working around it.
This approach illustrates a fundamental principle in wet room design: when there is no nearby technical stack, a gravity diversion is sought before considering a pumping system. Pumping works but adds an additional electromechanical component, a maintenance cost and a breakdown risk. A gravity diversion, when the configuration allows it, remains the most reliable long-term solution.
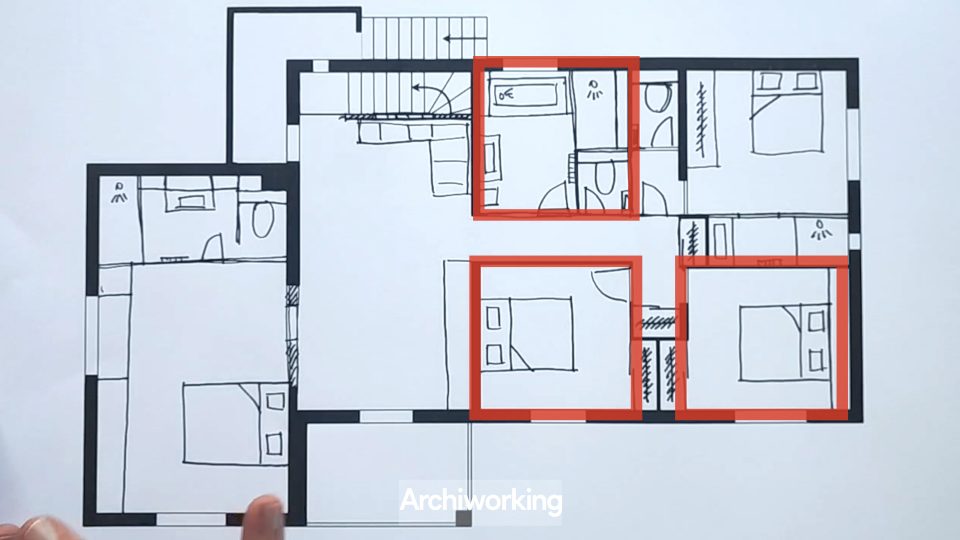
Master suite 2 and bedrooms 3 and 4
The second master suite is organised in the adjacent volume with a similar logic: wall-hung WC with hand basin, pocket sliding door, shower room with shower and 1 m vanity unit, heated towel rail. The bed is sized at 1.60 x 2 m, standard for a master suite. The walk-in wardrobe is integrated into the volume composition.

Bedrooms 3 and 4 reclaim the volumes of the existing bedrooms with optimised storage. Bedroom 3 integrates a wardrobe accessible from the hallway, a repositioned walk-in wardrobe and a sliding door to preserve floor area. Bedroom 4 creates a headboard boxing that simultaneously serves as an architectural divider and integrated storage. This type of multifunction boxing is a frequent solution in children’s or teenagers’ bedrooms where storage demands are high and space is limited.
Shared bathroom: bathtub, shower, WC and vanity unit
The shared bathroom serves bedrooms 3 and 4. It integrates a bathtub, a 1.60 x 90 cm shower with a boxing that doubles as a bench, a 1.20 m vanity unit with storage and a WC in a boxing. The network boxing in the shower is treated as a design feature: rather than concealing it in a false ceiling or routing around it, it is integrated as a shower bench. This is a typical example of a technical constraint transformed into a functional asset.
The bathtub is retained in this plan despite the presence of a shower for the reasons mentioned in the bathroom guide: heritage value, use with children and versatility of use. In a family home with children, a bathtub in the shared bathroom is systematically recommended.
Glass partition, living area and overall technical logic
The glass partition created at the staircase landing serves a double purpose: it circulates natural light between the staircase side and the shared living area, and it creates an architectural transition between the circulation zone and the shared lounge. This type of interior glass partition is particularly effective on floors where natural light is concentrated on the facades and does not penetrate into the central zones of the plan.
On the overall technical level, heating and air conditioning are provided by a reversible ducted heat pump positioned in the loft space, with a vent in each bedroom, a central vent in the hallway and a technical duct descending to the lower level. This centralised system avoids the proliferation of wall-mounted units and allows uniform temperature management across the entire floor. The loft access hatch is positioned in the hallway to maintain maintenance accessibility without passing through the bedrooms.
The result: two master suites, two independent bedrooms, three bathrooms with WC, a shared living area with glass partition and coherent technical logic across the entire floor. A fluid, functional and realistic upper floor for a family home. To see the ground floor plan of this same house, read the article on the ground floor layout and discover all our projects on the ArchiWorking channel.
Mathieu

How do you create 4 bedrooms on the upper floor of a 145 m² house?
By demolishing the existing partition walls to redistribute the volumes according to the desired uses. On this project: full demolition of the partition walls, redistribution into two master suites with shower room and walk-in wardrobe, two independent bedrooms with wardrobes, a shared bathroom and a communal living area. The key is to analyse the existing networks before drawing the new floor plan.
How do you create a bathroom without a nearby stack pipe?
By using a gravity diversion if the configuration allows it. On this project, the natural gradient of the staircase shaft allows the networks to be routed to the ground floor without a pumping system. This is the preferred solution when it is feasible: more reliable and less costly to maintain than an electromechanical system.
Should you keep a bathtub in the shared bathroom of a family home?
Yes, as the first choice. A bathtub in the shared bathroom of a family home with children is recommended for bathing young children and for the added value it brings to the property. A shower is also integrated for quick morning routines. Both can coexist comfortably with a well-designed layout.
What heating solution should you choose for a redesigned upper floor renovation?
A reversible ducted heat pump in the loft with vents in each room is the most efficient solution for a family home. It avoids the proliferation of wall-mounted units, allows uniform temperature management and integrates discreetly. The technical duct can descend to the lower floor to serve the entire house from a single system.