
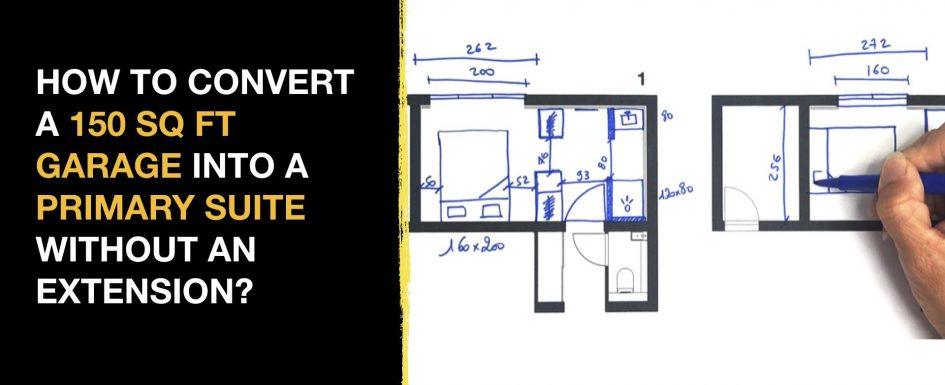
A 150 sq ft garage converted into a complete primary suite, without touching the outer envelope of the house: that’s the project Clara and Mathieu walk through here, with two possible floor plan options for the same tight footprint. For more examples of turning a non-bedroom space into a primary suite, take a look at our article on converting a former kitchen into a primary suite.
By Mathieu REY, Architecture and Space Planning Specialist (updated July 2026)
150 sq ft of garage, two ways to build a complete primary suite, without extending the house.
1. Existing layout: a 150 sq ft garage to convert into a primary suite
2. Creating a new circulation path: opening a load-bearing wall and removing the garage door
3. First floor plan option: bathroom, a 79-inch closet and bedroom with sliding glass doors
4. Second floor plan option: a 63×32-inch shower and a generous window
5. Permits and technical points: load-bearing walls, permits and working with an interior designer
6. Building a storage loft above the closet
7. Frequently asked questions
Clara and Mathieu walk through the existing layout, both floor plan options and the storage loft build in this video.
Existing layout: a 150 sq ft garage to convert into a primary suite
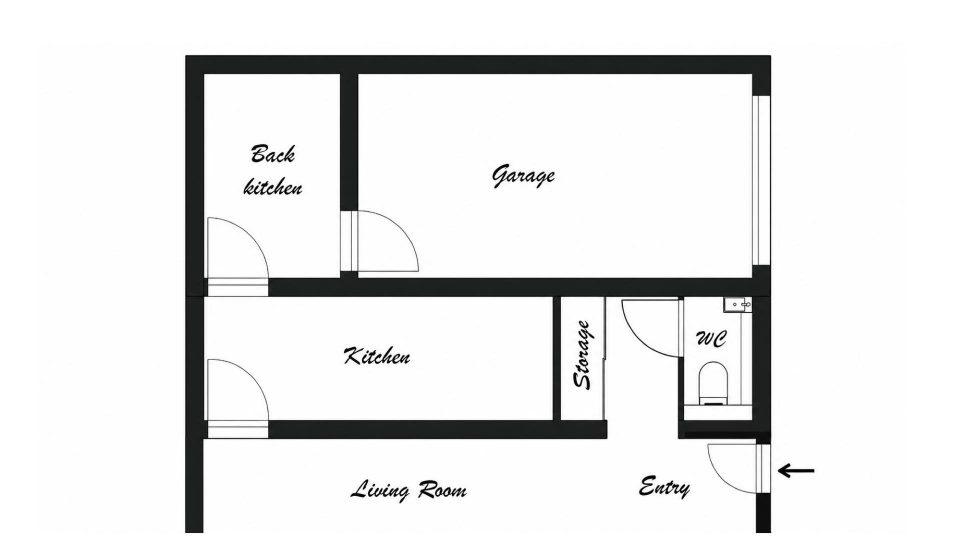
The house totals about 1,370 sq ft. The garage is reached from the entryway, which also leads to a hallway with a powder room and a storage nook, then to the kitchen and a back kitchen that currently connects to the garage. The garage measures roughly 17’1″ along its longest side and 8’10” in width, for a footprint just over 150 sq ft. It’s a decent-sized space, but it needs a careful redesign to fit a bedroom, a bathroom and a closet.
Two technical constraints shape the project. On one hand, an existing set of water supply lines and a toilet drain running down from the upper floor can be reused for the new bathroom, which avoids costly plumbing rework. On the other hand, there’s a marked difference in ceiling height: 13’4″ on one side, 8’1″ on the other. That slope, which might look like a drawback at first, becomes one of the project’s strongest assets once it’s put to use for storage.
Creating a new circulation path: opening a load-bearing wall and removing the garage door
The garage door, 7’4″ wide, is fully removed. The opening is closed off with masonry, along with the framing and insulation needed to seal it properly. The second major move of the project is rethinking circulation entirely: the goal is to stop accessing the future primary suite through the kitchen. A new opening is created in the load-bearing wall instead, sized for a comfortable passage and reinforced with a steel beam, to get a smooth path that fits naturally with the rest of the house.
Once this new path is in place, the old door connecting the garage to the back kitchen is sealed off: the frame is removed, the opening closed up cleanly and insulated. An L-shaped insulated furring wall is then built to conceal the existing utility lines while improving the sound and thermal performance of the future room. For another example of working a load-bearing wall into a design, take a look at our article on an open-plan kitchen with a structural column built into the island.
First floor plan option: bathroom, a 79-inch closet and bedroom with sliding glass doors
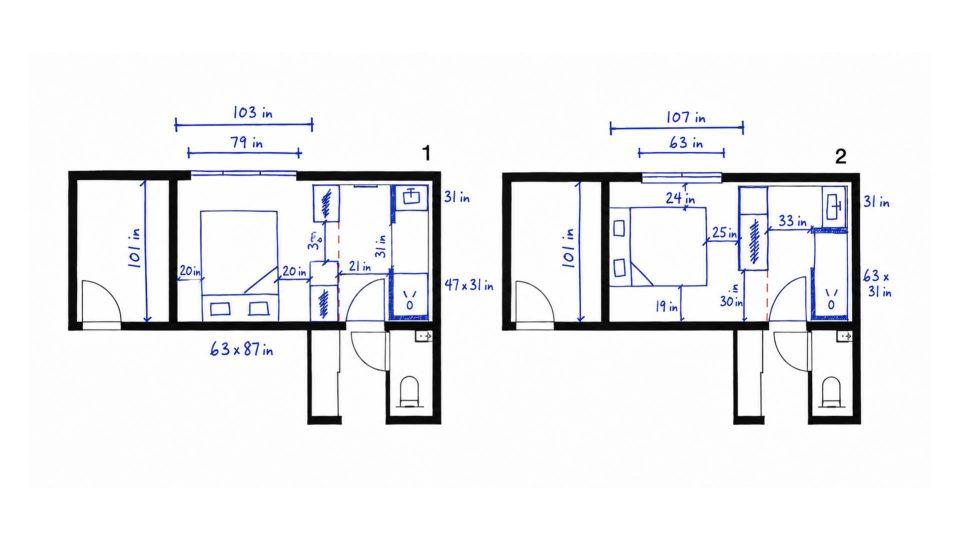
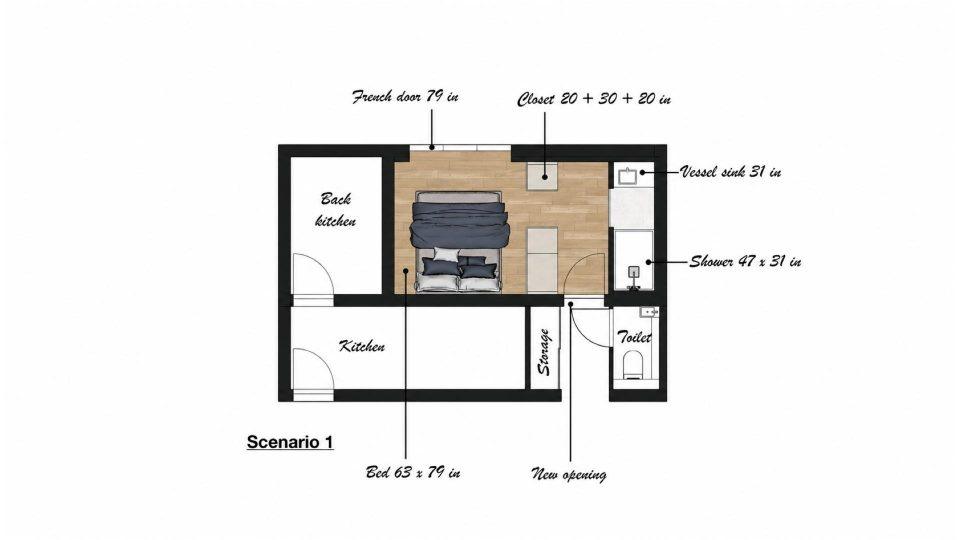
In this first proposal, the new access door sits where the load-bearing wall was opened, and a three-panel sliding glass door, about 6’7″ wide, brings in natural light and a generous view to the outside. The space is organized into three zones: the bathroom, the closet and the bedroom.
The bathroom is enclosed by a partition that fully separates the shower area. A technical furring wall at the back of the shower conceals the supply and drain lines. The shower measures 47×32 inches, facing an 32-inch vanity with storage underneath, with a comfortable 32-inch clearance between the two. The closet, built from off-the-shelf modules, two along the base and one facing them, provides roughly 79 inches of linear storage, enough to combine a hanging rod, shelving and drawers. There’s a 37-inch clearance into the suite, and a 30-inch clearance between the two closet sections, with a mirror on the wall opposite. Finished end panels neatly close off the sides, corners and backs of the units.
On this project, the existing toilet drain running down from the upper floor could be reused directly for the new bathroom. It’s a point we always check during the diagnostic phase: a well-placed existing line avoids costly floor rework and speeds up the whole build.
On the bedroom side, there’s about 8’7″ between the old garage wall and the closet, and 8’5″ the other way. The footprint stays tight, but it’s still enough to comfortably fit a queen-size bed, with roughly 20 inches of clearance on each side, a dimension that can shift slightly depending on the bed frame chosen. One thing worth flagging: when both the bedroom door and the closet door are open at the same time, the passage narrows, a detail worth refining at the final design stage.
Second floor plan option: a 63×32-inch shower and a generous window
In this second proposal, the access door is repositioned. This time, instead of a sliding glass door, the choice is a roughly 8’6″-wide window, still a generous opening, with, for example, two side sections of about 32 inches each depending on whether a sliding or hinged configuration is chosen.
The bathroom is enclosed behind the door, with the same technical furring wall at the back of the shower. The 32-inch vanity stays the same as in the first option, but this layout makes room for a much larger 63×32-inch shower, proof that a spacious, comfortable shower is achievable even in a 150 sq ft primary suite. To visually separate the bathroom from the bedroom and avoid walking straight into the shower area, an off-the-shelf closet unit about 69 inches wide is installed, with a 33-inch clearance followed by a second 30-inch clearance, both comfortable to use.
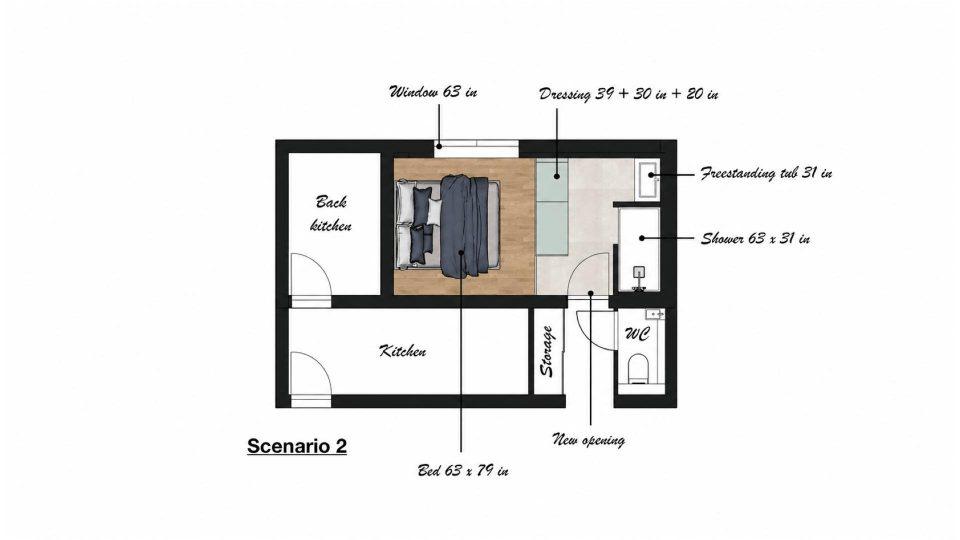
This layout also opens up more width around the bed: about 8’5″ on one side, 8’11” on the other, roughly 4 extra inches of clearance compared with the first option. The bed is positioned differently, with about 20 inches of clearance at the head and along one side. Since this option uses a window rather than sliding or French doors, there’s no need to keep a path to the outside at the foot of the bed, which leaves a 25-inch clearance there, still perfectly workable. Both options hold up well, each with its own strengths depending on what matters most: more generous natural light for the first, more circulation space around the bed for the second.
Permits and technical points: load-bearing walls, permits and working with an interior designer
Before starting a project like this, the feasibility of any opening in a load-bearing wall must be confirmed with a structural engineer, who will size the reinforcement, a steel beam or equivalent, needed to make the passage safe. It’s also essential to check the permits required for the scope of the project ahead of time: these vary by jurisdiction, and can range from a simple permit to a full building permit depending on whether habitable square footage changes.
Bringing in an interior designer from the diagnostic stage lets you plan around these regulatory requirements at the same time as the design choices, rather than discovering them mid-construction. It’s also a chance to catch details that often get overlooked, like preserving existing utility lines or properly insulating around the old garage door opening.
A garage starts out with neither the insulation nor the utility lines of a living space. Before even sketching the interior layout, three things need to be confirmed: the structure (whether a load-bearing wall needs opening), the permitting (what’s required for the scope of work), and the technical side (existing lines to keep or new ones to run). Skip this step, and you risk a full redesign mid-construction.
Building a storage loft above the closet
The difference in ceiling height, 13’4″ on one side and 8’1″ on the other, creates a slope that would be a shame to leave unused. The idea is to align a storage loft above the closet, on both sides, across the full available width.
The structure rests on joist hangers fixed into the load-bearing walls on both sides, with beams spanning the full width of the room. A double OSB subfloor, a relatively affordable solution, then creates a large enclosed storage volume. Two access points, one on each side, are closed off with sliding doors: a practical solution that provides independent storage without shrinking the usable floor area of the bedroom. A small access hatch is also built in on the powder room side to keep access to the utility lines for any future work.
Aside from the new opening in the load-bearing wall, this is the only work done in this part of the house: the goal remains to preserve as much of the existing finishes as possible, from a previous renovation that was already well done.
Check out all our floor plan transformation projects on the ArchiWorking channel.
Mathieu REY


Frequently asked questions about converting a garage into a primary suite
Can you convert a garage into a primary suite without a building permit?
It depends on the scope of the work and whether habitable square footage changes. A straightforward interior reorganization, with no new opening on the facade and no change of use, may only require a simple permit rather than a full building permit. As soon as a load-bearing wall opening or a facade change is planned, check with your local building department before starting work.
Which shower size works best in a 150 sq ft primary suite?
Both options work well in this footprint. A 47×32-inch shower, as in the first option, frees up more room for the closet and bedroom. A 63×32-inch shower, as in the second option, offers noticeably more comfort if the layout allows for it. The choice mostly comes down to how much space is left once circulation and the closet are placed.
How do you fit a 79-inch closet into a small primary suite?
Off-the-shelf modules, two along the base and one facing them, get you roughly 79 inches of linear storage combining a hanging rod, shelving and drawers. Finished end panels keep the sides and backs of the units looking clean. Keeping at least a 30 to 32-inch clearance between modules ensures comfortable everyday circulation.
How do you build a storage loft in a primary suite under a sloped ceiling?
The loft aligns above the closet, using the tallest part of the ceiling. Joist hangers fixed into the load-bearing walls and beams spanning the width of the room support a double OSB subfloor. Two access points with sliding doors close off the space, while an access hatch keeps utility lines reachable if needed.
Can you open a load-bearing wall to create access to a primary suite?
Yes, as long as feasibility is confirmed by a structural engineer, who will determine the reinforcement, a steel beam or equivalent, needed to make the passage safe. On this project, opening the load-bearing wall made it possible to create a new circulation path to the primary suite without going through the kitchen, a change that noticeably improves everyday comfort.