
The bathroom was too small. But right behind the wall, a 22 sq ft closet was sitting unused. By removing the partition and rethinking the layout from scratch, we turned a cramped space into a 65 sq ft bathroom with a large walk-in shower, built-in niches, and real storage. Here is how the project was designed and built, step by step.
By Mathieu, Certified Interior Architect (updated May 2026)
A bathroom too small, an unused closet right next door — sometimes the solution is already in the walls.
1. Existing conditions: a 43 sq ft bathroom with a closet worth reclaiming
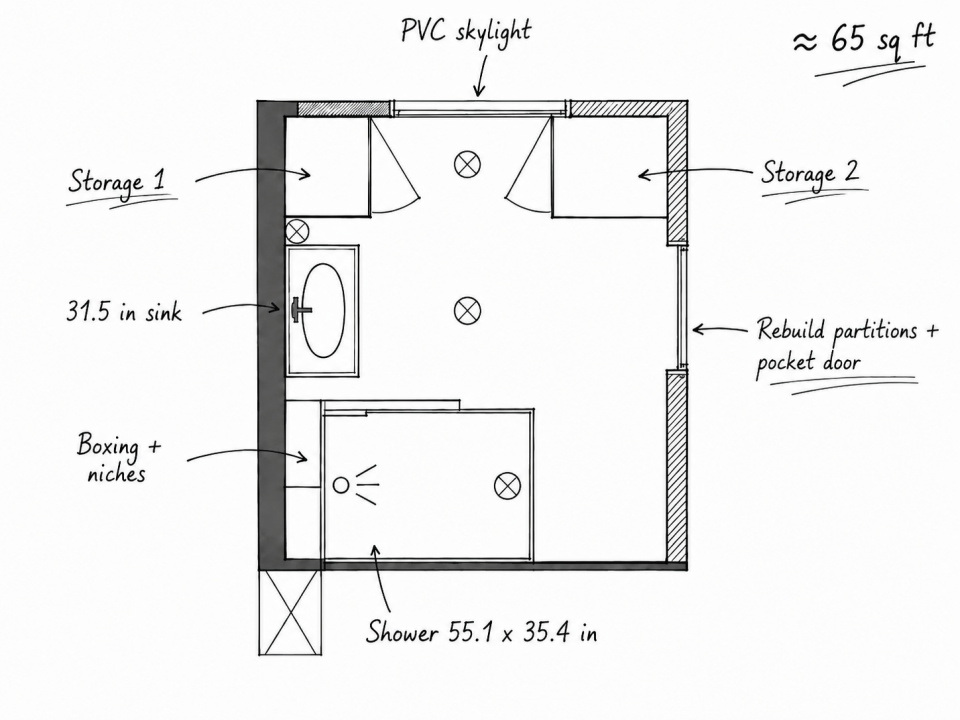
2. How to expand a bathroom without an extension: reading the floor plan
3. Pocket door and borrowed light: two structural decisions made at the plan stage
4. 55 x 35 in shower, built-in niches, vanity, and storage: the full program
5. From plan to build: strip-out and reconstruction
6. Stone-effect tile, chocolate wall tile, and glass shower panel: material choices
7. Before and after: 22 sq ft gained, 65 sq ft bathroom delivered
8. Frequently asked questions
Existing conditions: a 43 sq ft bathroom with a closet worth reclaiming
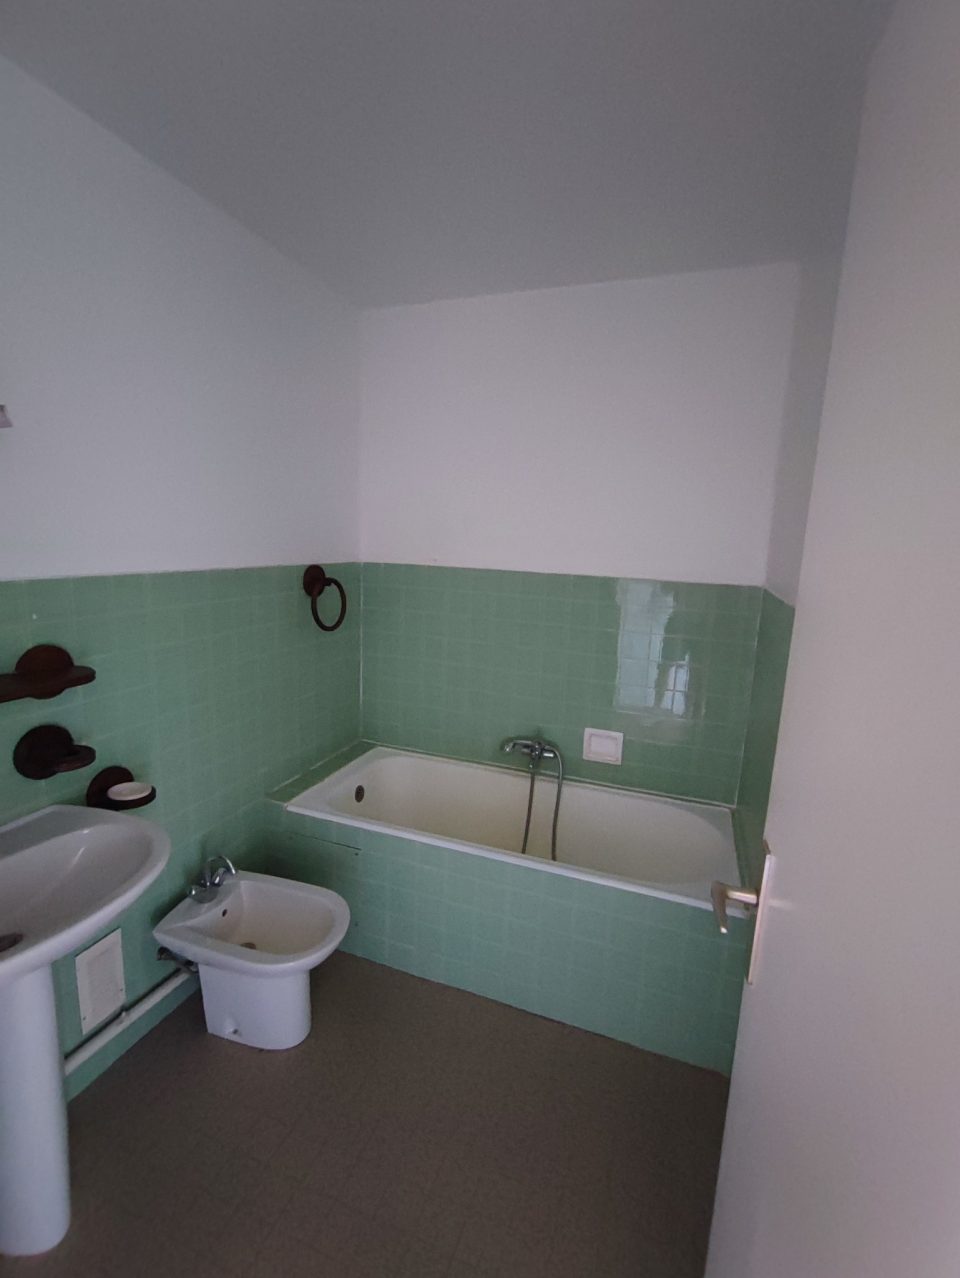
The existing bathroom measured roughly 7 ft 10 in by 8 ft 2 in — 43 sq ft of constrained space, most of it taken up by outdated fixtures: a standard 67 x 28 in bathtub, an old bidet, and a vintage sink. A cluttered program that no longer matched how the owner used the space.
Directly behind the shared partition wall sat a closet about 6 ft 7 in deep — roughly 22 sq ft of underused space. By removing the non-load-bearing block partition, the two side returns, and the closet door, it became possible to absorb that volume into the bathroom and start fresh with a completely rethought layout.
Clara and Mathieu walk through the project and all the design decisions in this video.
How to expand a small bathroom without an extension: reading the floor plan first
The combined footprint — existing bathroom plus the 6 ft 7 in closet — would yield roughly 65 sq ft once the partitions were removed and the volumes merged. This is how renovation works at its best: before adding anything, you start by identifying what can be recovered.
The strip-out was total — a clean slate. That reset made it possible to reroute all water supply lines, drain lines, and electrical runs to match the validated floor plan, rather than designing around outdated network positions.
Pocket door and borrowed light: two structural decisions made at the plan stage
A standard hinged door would have consumed a swing arc of 24 to 32 in in an already tight volume. A pocket door was the natural choice. It requires a slightly thicker partition to house the sliding mechanism — typically 6 to 8 in finished — but in this configuration that was easily absorbed by the layout. The result: no swing clearance lost, smooth circulation, and the full footprint available for fixtures.
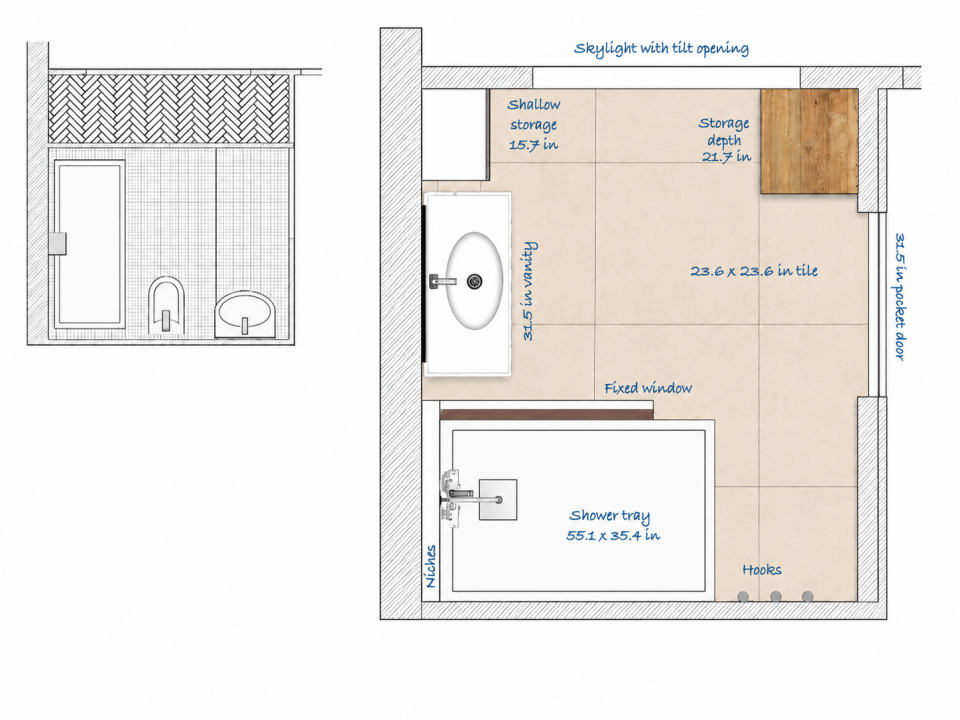
The owner also wanted borrowed natural light from the adjacent living spaces. The solution: a 5 ft fixed transom panel set at floor level. It allows furniture to be placed under the opening while still letting daylight through — no exterior wall penetration required, and an immediate light gain in a space with no direct window.
A third constraint, technical this time: the toilet was located immediately next door. Its shared drain stack required a specific chase wall on the shower side. That wall thickness was put to work creating the niches and the shelf — turning a constraint into a design asset.
A pocket door recovers an average of 24 to 32 in of swing clearance in a small bathroom. The non-negotiable condition: plan the partition thickness at the design stage — typically 6 to 8 in finished. Once the walls are up, it is too late to integrate cleanly. This is a design-phase decision, not a construction-phase fix.
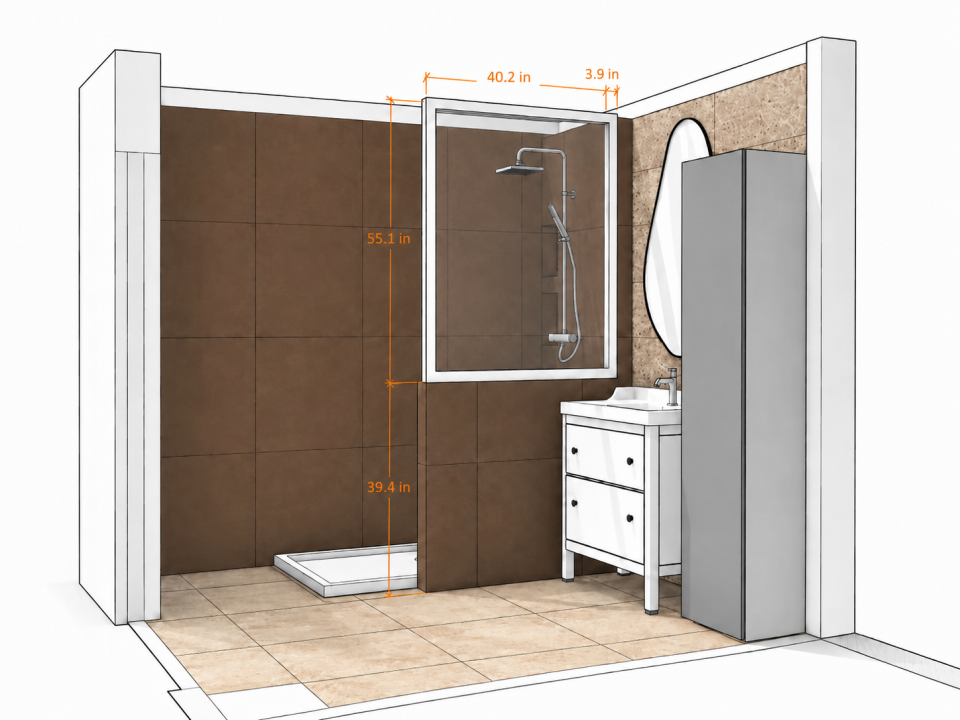
55 x 35 in shower, built-in niches, vanity, and storage: the full program
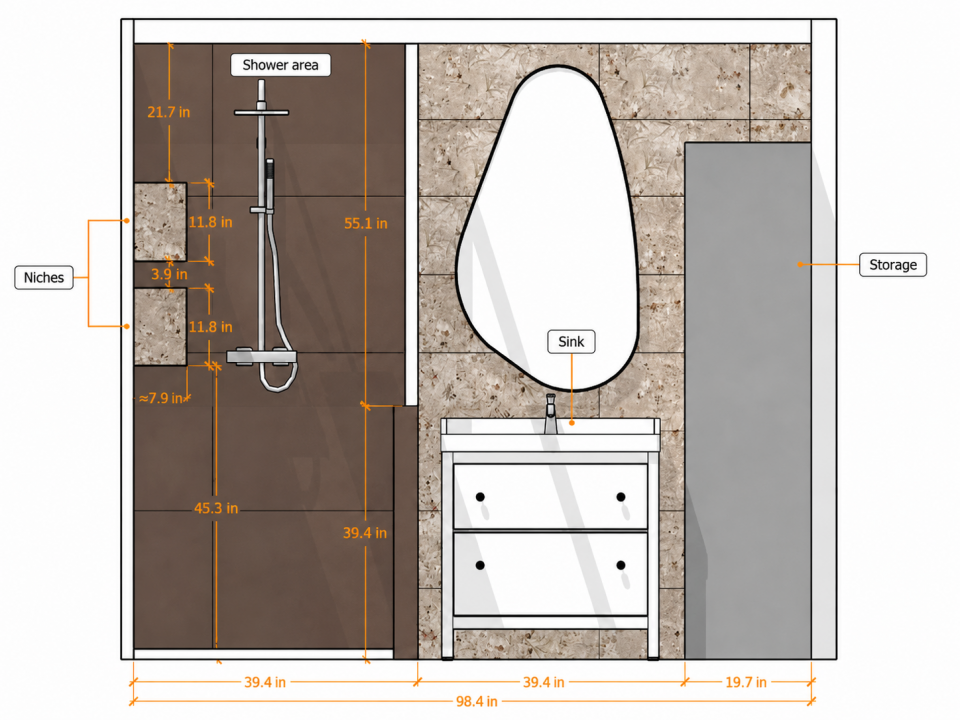
The shower, positioned along the technical chase wall, measures 55 x 35 in — generous for the available footprint and comfortable for daily use. A functional shelf at 39 in height defines the shower edge on the vanity side and creates a practical ledge. Inside the chase-side wall, a double niche was built in at a finished depth of 3.5 in, enough to hold toiletries without any surface-mounted accessories.
The 31-inch vanity is positioned between the shower pan and the storage unit — a deliberate choice to keep the room feeling open. That shallow storage unit approaches the transom panel without blocking it. Opposite, a near-square cabinet at 24 x 22 in and 71 in tall completes the program. The clearance kept between the top of the cabinet and the transom opening preserves the sense of volume.
For a deeper dive into how this type of project pairs with a more radical bathtub-to-shower conversion, see our article on the 91 sq ft bathroom remodel with walk-in shower and enclosed toilet.
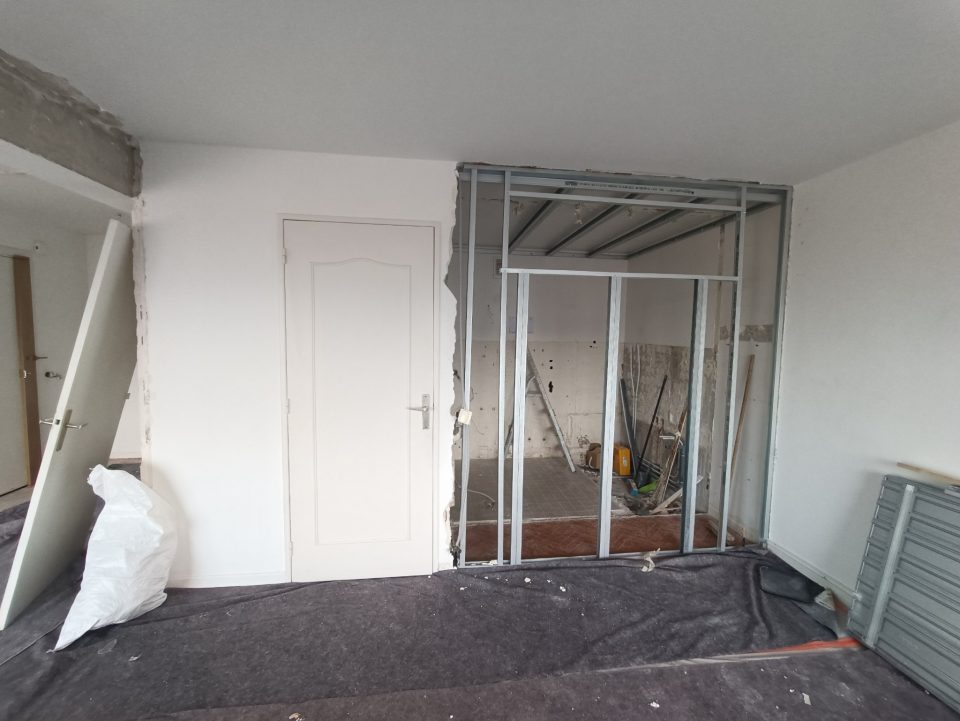
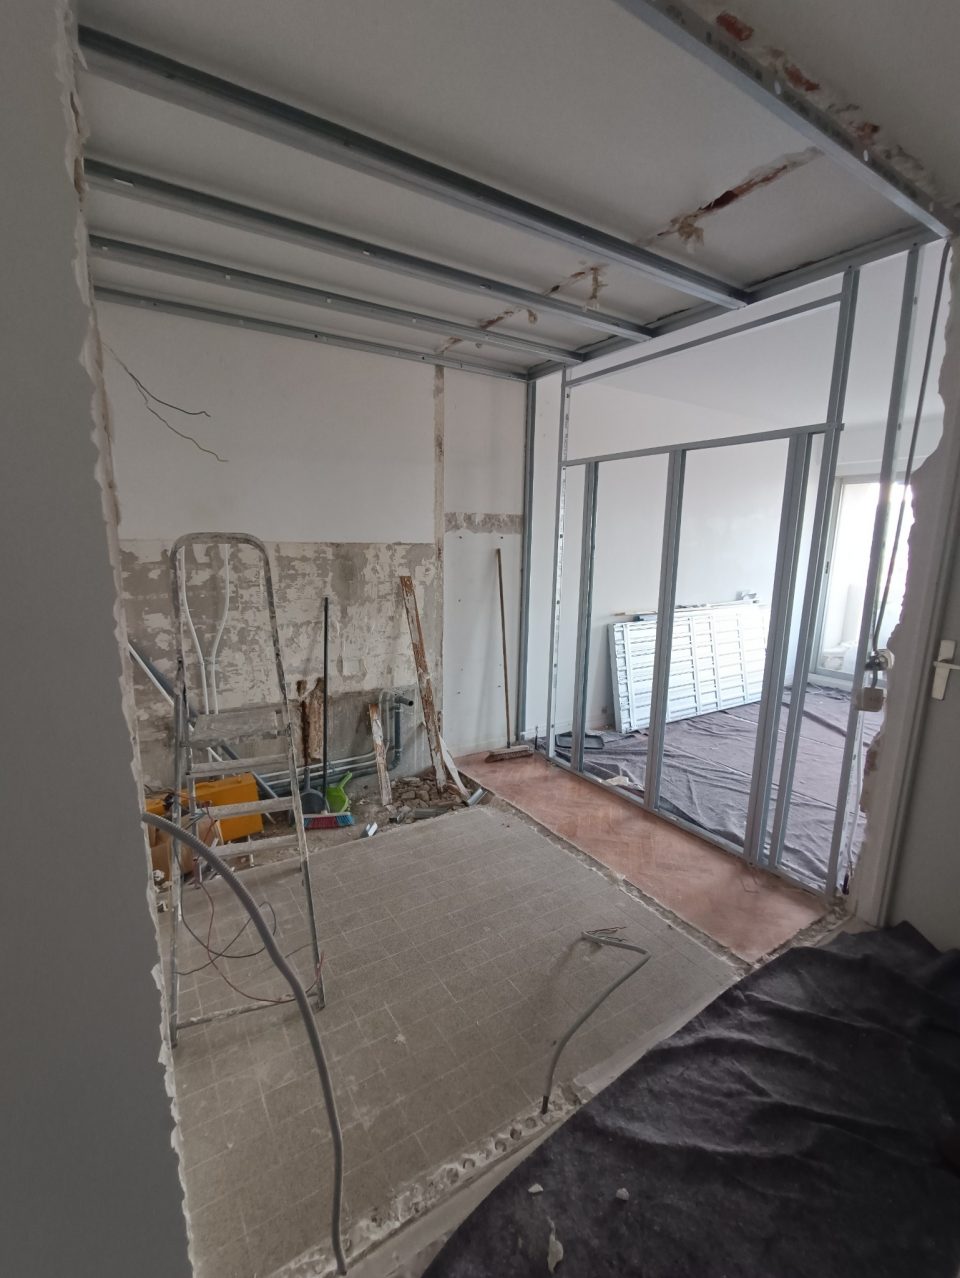
From plan to build: full strip-out and reconstruction of the space
Construction started with a complete strip-out: existing tile, old partitions, and all fixtures removed down to the substrate. The footprint left by the bathtub created extra clearance under the dropped ceiling, making it easier to route the new supply and drain lines — a detail that often goes unnoticed but can significantly simplify rough-in work in a renovation.
Galvanized steel framing was then set for the new partitions and the dropped ceiling structure. Drywall followed, and the volumes started to take shape. The 39 in shelf and the pocket door were integrated at this phase. The double shower niche was built into the available depth of the chase-side wall — 3.5 in finished, 12 in high per niche — giving each product its own slot without any surface-mounted hardware.
Before launching a remodel of this scope, reviewing the key points of any contractor quote is essential.
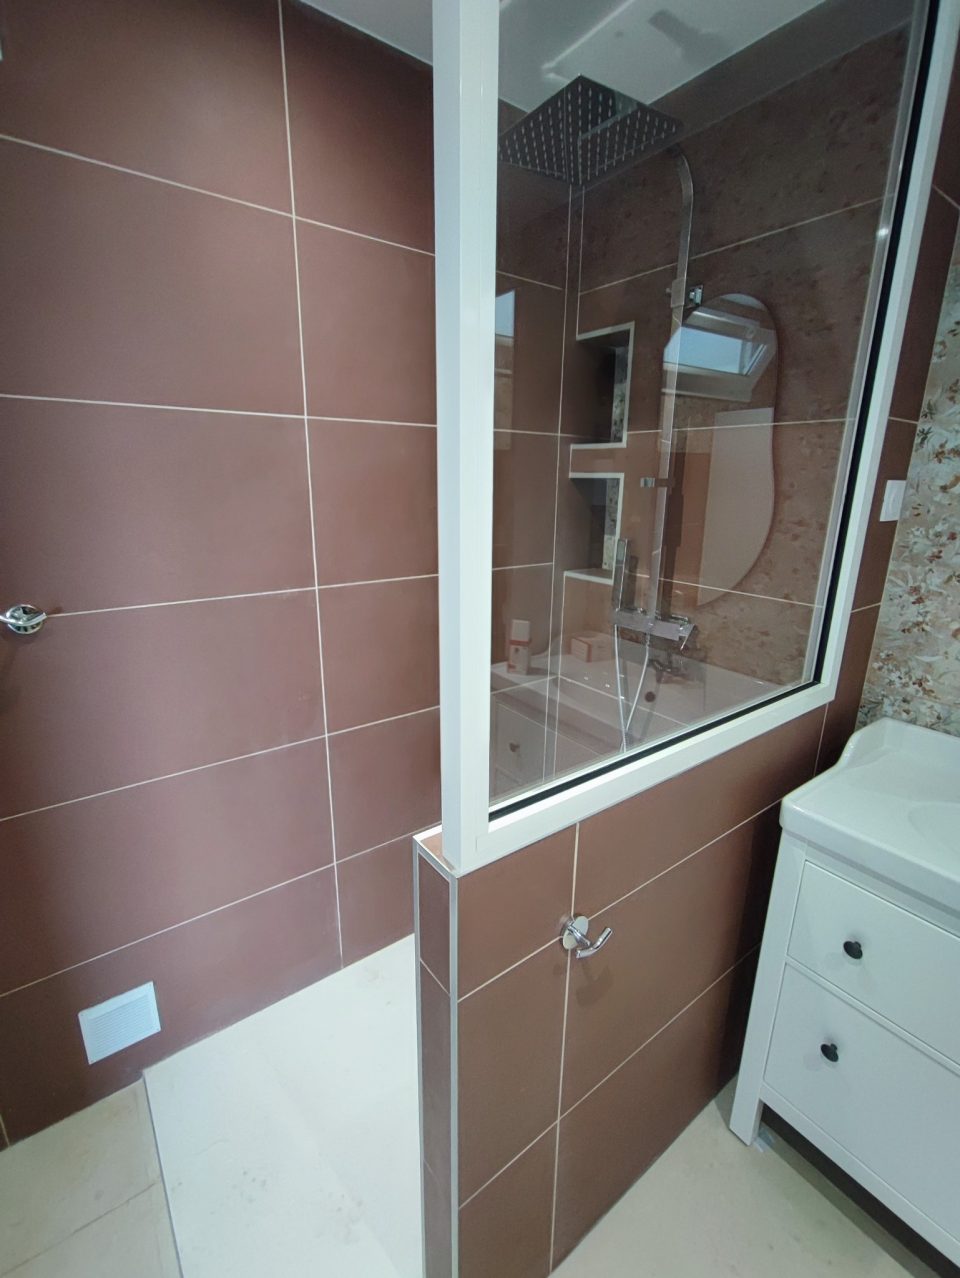
Stone-effect floor tile, deep chocolate wall tile, and glass shower panel: material choices
The floor is a raw natural stone-effect tile running continuously through all zones without a break. On the walls, two tiles work together: a deep chocolate solid and a floral pattern. The combination gives the bathroom a slightly vintage feel, reinterpreted in a contemporary register. Tile transitions were positioned at grout lines to protect the finish at the junctions — an execution detail that pays off over time.
The vanity and faucet hardware reinforce that reading. The mirror and the large glass shower panel add a modern note that visually lightens the space. The glass panel does more than define the shower: it lets the borrowed daylight travel all the way to the back of the enclosure.
A glass shower panel in a small bathroom is not just an aesthetic choice. It keeps natural light moving to the back of the shower, where a solid partition would stop it cold. In this project that matters especially, since all the daylight enters as borrowed light from the living space. Glass diffuses it; a wall kills it.
Finishes on the living-space side were also addressed: color-matched paint and a refinished hardwood floor to erase the last traces of the old closet removal. The renovation doesn’t stop at the bathroom door.
Before and after: nearly 22 sq ft gained, a 65 sq ft bathroom transformed
The final result: nearly 22 sq ft gained and a completely different space. From a cramped bathroom with a bathtub, a bidet, and a vintage sink, to a functional 65 sq ft wet room — a comfortable 55 x 35 in shower, a 31-inch vanity, a double built-in niche, two purpose-sized storage units, and smooth circulation throughout. The pocket door frees the entry, the glass panel preserves the light, and all the plumbing is concentrated on a single technical wall.
That is what floor plan methodology delivers: identify available volumes before selecting fixtures, and build the program around existing constraints rather than fighting them. The solution was already in the plan. It just required recovering the right volume. More real renovation projects commented step by step are available on our before and after renovation articles.
Find all our renovation projects on the ArchiWorking YouTube channel.
Mathieu

Frequently Asked Questions About Small Bathroom Remodels and Closet Conversions
How do you expand a small bathroom without touching load-bearing walls?
The most effective approach is to reclaim underused adjacent spaces: closets, hallway alcoves, or storage areas. Removing the non-load-bearing partition between those spaces and the existing bathroom increases the available footprint without any structural work. An interior architect can verify technical feasibility and provide accurate cost estimates before any demolition begins.
What is the budget for a complete 65 sq ft bathroom remodel?
For a fully remodeled 65 sq ft bathroom with a walk-in shower, pocket door, vanity, floor tile, and wall tile, the typical range is €8,000 to €18,000 all-in depending on the finish level, labor costs, and material choices. Demolition, new partition framing, plumbing rough-in, and electrical work usually represent the largest share of the budget.
Why choose a pocket door for a small bathroom remodel?
A hinged door requires a swing clearance of at least 24 to 32 in. In a 65 sq ft bathroom, that is usable space. A pocket door slides entirely into the wall and frees that area completely, allowing a fixture or cabinet to be placed right up to the door frame. It requires a slightly thicker partition — 6 to 8 in — but the space payback is immediate.
How do you build shower niches into a bathroom renovation?
Shower niches are built into the depth of a chase wall or a framed partition. A finished depth of 3.5 in is enough to hold standard toiletry bottles. The key is to plan their location at the floor plan stage, taking advantage of technical chases that already provide the necessary depth without creating extra wall thickness.
Can you really use a closet to expand a bathroom?
Yes — provided the shared wall is non-load-bearing and the plumbing and drain lines can be consolidated. In this project, the adjacent toilet’s drain stack made it possible to concentrate all the plumbing on a single technical wall, which significantly simplified the rough-in work. A structural check before any demolition is always required.