
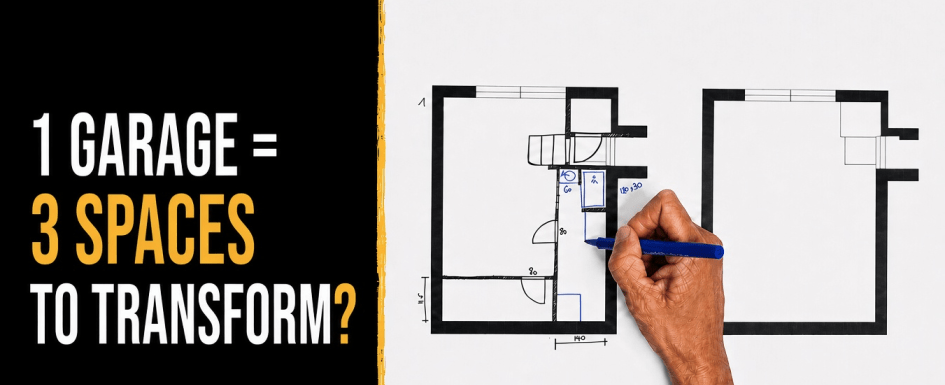
About 250 sq ft is enough in this real project to plan a complete primary suite with a bedroom, bathroom, laundry area, toilet and storage, provided the circulation is completely reworked and the existing constraints are used rather than ignored. Starting from the measured floor plan of an old garage, we compare two layouts that divide the available space in different ways. This type of analysis, used by an interior designer or an interior design firm before a layout is finalized, makes it possible to test several options before committing to construction. You can also explore our other renovation and space planning case studies.
By Clara AJMAR, Interior Design & Landscape Specialist (updated September 2026)
250 sq ft, two floor plans and one goal: fit a real primary suite, laundry area and storage into the garage without adding square footage.
1. Real project: how does an interior designer analyze a 250 sq ft garage before converting it into a primary suite?
2. How can you reconfigure the stairs and circulation to save space?
3. Option 1: use 43 sq ft for a bathroom with laundry and create separate storage
4. Option 2: enlarge the shower and create a 54 sq ft laundry and storage area
5. Hinged door or pocket door: which works best in a small space?
6. Which layout works best for converting a 250 sq ft garage into a primary suite?
7. Frequently asked questions about converting a garage into a primary suite
In this ArchiWorking video, Clara and Mathieu review the existing floor plan, analyze the garage constraints and draw two different ways to integrate the bedroom, bathroom, laundry area, toilet and storage.
Real project: how does an interior designer analyze a 250 sq ft garage before converting it into a primary suite?
Before drawing a new partition wall, the first step is to understand the existing volume. The garage measures approximately 13 ft 11 in wide by 17 ft 7 in long, for a measured floor area of about 250 sq ft. An existing opening has already been converted into a glazed door approximately 7 ft 10 in wide. It will become one of the main sources of natural light for the future suite.
The first challenge is the difference in floor levels. The existing stair connects the garage to the house across a total height difference of about 31 1/2 in. At the upper level, it continues into a small landing measuring roughly 35 by 37 in. Including that landing, the existing stair occupies approximately 8 ft 1 in in length. In a room of only 250 sq ft, that footprint has a major impact on the layout.
The garage also includes an existing mezzanine. It will not be redesigned during this first phase, but it still needs to be considered when reading the floor plan. The highest part of the garage has a ceiling height of about 11 ft 7 in, while the clear height under the mezzanine beams is about 9 ft 4 in. This is therefore not simply an empty rectangular room. Several floor and ceiling levels have to work together.
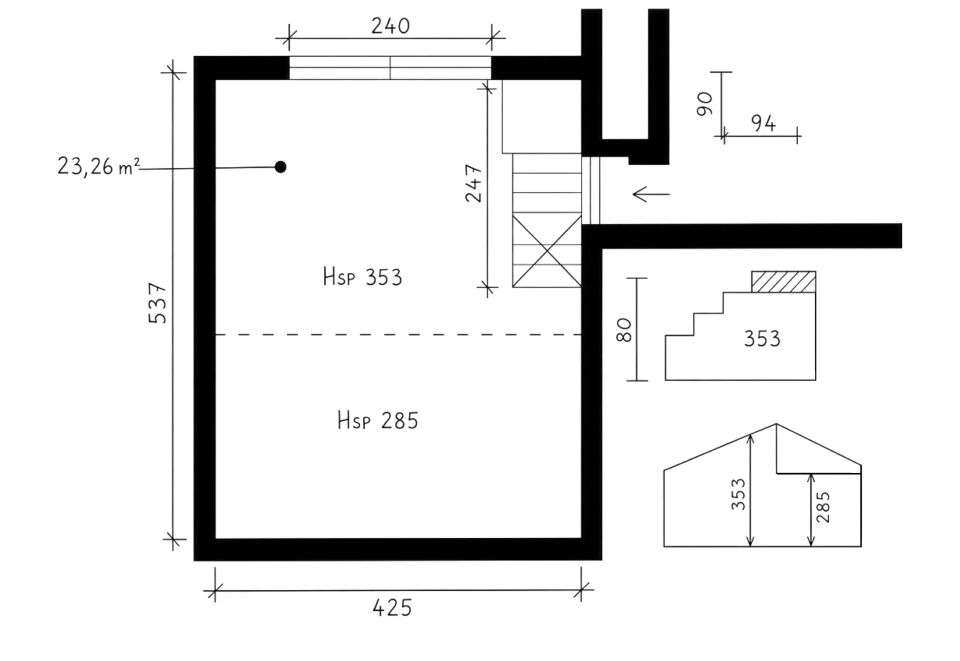
The existing utility lines are the second major starting point. Water lines are already available along the lower side of the garage and can be reused for the future laundry area. Near the upper landing, existing drains make it possible to study the addition of the enclosed toilet requested by the homeowner. A site investigation will help determine how far the technical chase can be pushed back in order to keep the toilet as comfortable as possible.
This stage shows why converting a garage into a primary suite involves much more than placing furniture on a floor plan. An interior designer has to coordinate dimensions, ceiling heights, changes in level, natural light, plumbing, openings and circulation before the partitions are finalized. For an even tighter example, see our 150 sq ft garage conversion into a primary suite.
How can you reconfigure the stairs and circulation to save space?
The existing staircase is too bulky to remain unchanged. Its lower section is removed, while the upper slab is retained to maintain the connection between the main floor of the house, the future toilet and the primary suite. This decision frees up an important central area that can then be redistributed.
In both options, a new masonry stair is drawn across the width of the garage. This position shortens circulation routes and prevents the steps from cutting through the bedroom or technical areas. The redesign is also an opportunity to rebalance the risers and improve comfort between the garage floor and the existing house level.
Another adjustment is made in front of the glazed door. A raised threshold is created across the full width so that the fourth step can be absorbed into the new floor buildup. The finished floor and insulation layer help manage part of the level difference, leaving only three visible steps to reach the main floor of the house.
When a floor needs to be rebuilt and insulated, the added thickness should not automatically be treated as wasted space. Depending on the project, it can help absorb a small level difference, improve the connection at a threshold or provide a route for certain utility lines. This has to be checked during the floor plan stage against the actual floor assembly, available ceiling height, required slopes and the technical constraints of each line.
This is the kind of decision that creates usable space without increasing the footprint. The goal is not necessarily to gain more square footage, but to make each level, opening and circulation path perform more than one function.
Option 1: use 43 sq ft for a bathroom with laundry and create separate storage
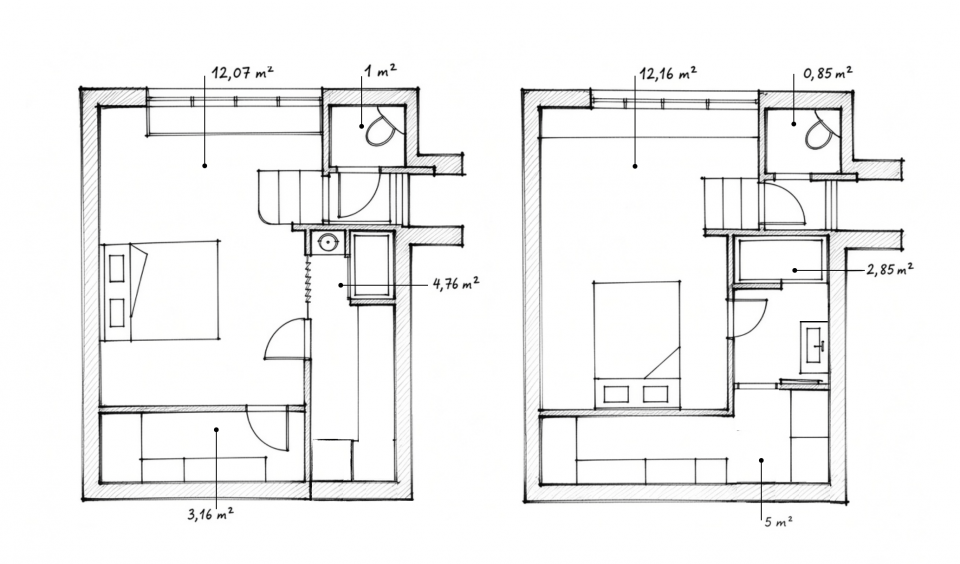
The first floor plan creates a partially enclosed landing from which the different spaces can be reached without crossing through the bedroom or bathroom. The toilet is fully enclosed in a space of about 11 sq ft to preserve privacy. A hinged door opens onto the circulation area.
The remaining technical area is organized in an L shape. The bathroom and laundry zone has a width of about 4 ft 7 in, while the separate storage area is approximately 3 ft 9 in wide. The connecting doors are about 32 in wide and remain hinged in this option.
The bathroom receives borrowed natural light through a fixed interior glass panel facing the bedroom. Two full-height half-walls then structure the shower, vanity and laundry countertop. Their tiled finish creates clear separation between the wet and utility zones without closing the room completely.
The shower tray measures approximately 28 by 47 in. The countertop supporting the vessel sink is about 24 in deep. In the laundry area, the washer and dryer are stacked to preserve more countertop and storage space. They could also be installed side by side under the countertop if that better suits the appliances and daily use.
The storage room remains independent and uses adjustable track shelving so shelf heights can be changed according to what needs to be stored. In this first option, the bedroom retains about 137 sq ft, the bathroom occupies roughly 43 sq ft and the separate storage area provides a little more than 32 sq ft.
On this project, the position of the existing water supply and drain lines directly influences the location of the laundry area and toilet. Reusing well-positioned utilities makes it possible to group technical functions together. Before relocating a bathroom or laundry area on a floor plan, we always check where the supply lines, drains and realistic connection points are located.
Option 2: enlarge the shower and create a 54 sq ft laundry and storage area
The second layout works with the same constraints but changes the priority given to each surface. The toilet remains fully separated from the primary suite, but the hinged door is replaced by a pocket door. This removes the door swing from the landing, although the pocket frame itself requires additional wall thickness.
The new staircase remains positioned across the width of the garage. In this option it is straight, with a short return wall beside it. This wall helps guide movement, improves safety around the steps and creates a clearer boundary between the circulation zone and bedroom.
The bathroom and laundry zone keeps the overall L-shaped organization, but uses fewer doors. Circulation becomes more linear. A 28 in sliding door connects the bathroom to the laundry and storage area, while a 32 in hinged door connects the technical spaces to the rest of the suite.
The biggest change is the shower. The tray increases to approximately 55 by 32 in, making it noticeably more generous than the 28 by 47 in shower in the first option. The fixed interior glass panel is removed, although a glazed door could still be considered to preserve some borrowed light and visual transparency.
The vanity also increases to about 32 in and includes an integrated sink with drawers below. The bathroom itself becomes more compact at about 31 sq ft while still providing a larger shower and more vanity storage.
The additional floor area is mainly assigned to the laundry and storage zone, which now provides about 54 sq ft. The washer and dryer remain stacked and a large L-shaped shelving system uses the available wall space. The bedroom area changes very little compared with the first option. The toilet loses about 2 sq ft because of the pocket-door assembly.
Hinged door or pocket door: which works best in a small space?
The two layouts show that door type should not be chosen on appearance alone. In the first option, 32 in hinged doors work because their swing does not interfere with the main circulation routes. They are straightforward to install and do not require a dedicated pocket frame inside the wall.
In the second layout, the toilet receives a pocket door because the problem is different. Removing the swing keeps the small landing clear and avoids a conflict between the door and circulation. The pocket frame does, however, occupy wall thickness and limits what can be installed inside that section of wall. A similar solution is shown in our 91 sq ft bathroom project with an enclosed toilet and pocket door.
The 28 in sliding door between the bathroom and laundry area answers another problem. Its main purpose is to reduce the number of door leaves crossing one another in a tight space. The best system therefore depends on wall positions, furniture, technical equipment and the way people actually move through the room.
Which layout works best for converting a 250 sq ft garage into a primary suite?
Both floor plans meet the same program but prioritize different uses. In the first option, the bathroom reaches about 43 sq ft and receives borrowed light through the fixed glass panel. Storage is clearly separated and provides a little more than 32 sq ft. The bedroom measures approximately 137 sq ft.
The second layout reduces the bathroom to about 31 sq ft but provides a 55 by 32 in shower and a 32 in vanity. In exchange, laundry and storage are combined into a roughly 54 sq ft area. There are fewer doors and circulation becomes more linear.
At this stage, there is no single correct floor plan. The two options help determine what matters most: more bathroom floor area, borrowed light and separate storage, or a larger shower with a more generous laundry and storage zone. That is precisely why several layouts are useful before the final design is developed.

This sketch opens the discussion toward the next project phase. The strongest ideas from each layout can be retained, adjusted and combined into a more developed design. This is also one of the main benefits of working with an interior design firm or another qualified space-planning professional before construction: several distributions can be compared on paper before their consequences for storage, daylight and circulation become permanent.
In only about 250 sq ft, this project shows that success depends less on how many functions are requested than on how they are connected. The staircase, raised threshold, utility lines, doors, mezzanine and level changes do not disappear. They become the starting information used to build a coherent layout.
Explore more real floor plans, layout comparisons and interior design projects on the ArchiWorking YouTube channel.


Frequently asked questions about converting a garage into a primary suite
How much space do you need to convert a garage into a primary suite with a bathroom?
There is no single minimum floor area that guarantees a workable layout because the result also depends on openings, utility lines and circulation. In this project, about 250 sq ft is enough for a roughly 137 sq ft bedroom, bathroom, enclosed toilet, laundry area and several storage zones. Another ArchiWorking project shows that a primary suite can also be studied within a 150 sq ft garage when different compromises are made.
Can you install a bathroom and laundry area in the same garage conversion?
Yes, provided the water supply and drainage configuration supports it. Here, existing utility lines along the lower side of the garage are reused to keep the technical equipment grouped together. The first option combines a roughly 43 sq ft bathroom with laundry and separate storage. The second creates a 31 sq ft bathroom and a combined laundry and storage area of approximately 54 sq ft.
Does a pocket door always save space in a small primary suite?
A pocket door removes the swing clearance required by a hinged door, which can significantly improve a tight circulation area. However, the frame has to fit inside the wall and may slightly reduce usable area or prevent utilities from being installed in that section. In this project, it works particularly well for the toilet in the second option, while standard hinged doors are perfectly workable in the first.
How can an interior designer help with a 215 to 270 sq ft garage conversion?
The main value is being able to compare several complete floor plans before construction begins. An interior designer can test the relationship between the bedroom, bathroom, laundry, storage, circulation and existing utilities, then identify the compromises created by each option. This is especially useful in a garage where level changes and existing plumbing can have a major impact on the final layout.
Should you prioritize a larger bathroom or more laundry and storage space?
It depends on daily priorities. The first option gives more floor area to the bathroom and adds a fixed glass panel, while storage remains separate. The second reduces the bathroom footprint but keeps a large 55 by 32 in shower and creates approximately 54 sq ft of combined laundry and storage. Drawing both options makes those trade-offs visible before the final version is developed.